Links, Timeline and Other Information

Tuesday 30 June 2015

KD is for Knock Down - Part 2 (Demolition)

Goodbye Fibro Shanty
Firstly, I'd like to discuss our personal experience. DemoCorp is a professional business that conducts demolition in and around Sydney. The team were fantastic to deal with. It was a pleasure to work with James and Belinda who run the business, and Jomana within the admin office.
Together, the team helped make the work a smooth and painless exercise.
I spoke with several neighbours on the adjacent properties who remarked at how well they managed this project. That alone kept my mind at ease. The team also kept the job site and roadway clean and tidy.

Let's go through the chronology of the demolition job and the site preparations since April.

Since April we have been working in the garden to recover some Agapanthus plants and sandstone flagging that will be used later on when we landscape the site.  Unfortunately, there really was absolutely nothing worth saving inside the house.

16th May -> 6th June - Clearing the site of sandstone garden edging and plants which will be recycled.
16/5 Sandstone garden edging removal
17/5 Sandstone stockpile growing!


31/5 Sandstone pile continues to grow!
6/6 Agapanthus piles-a-plenty
 10th June - Jeff from Tree Raider removes large Mango Tree.  No permit required due to it being a fruit tree.
10/6 Mango tree is removed - Note the damaged fence panels due to the Mango Tree.
11th June - Site fencing and Power Disconnected
11/6 - Site Fencing is up and we are ready to go
 12th June - Asbestos removal begins

12/6 Asbestos Cladding is removed
15th June - Work continues with removal of masonry and recycling of materials (steel, copper and such)

15/6 Masonry removal
 16/17th June - Hygienist provides clearance certificate
 18th June - Excavator arrives onsite. Mechanical removal preparations
18/6 11:50am Excavator onsite and ready for mechanical demolition
Mechanical removal begins at 11:50 am.

Completely off topic; If you really want to see Chris hard at work, check out this absolutely amazing video; Giving a Kookaburra a head scratch.

First load is ready for transport 20 minutes later (12:10pm).
18/6 12:10 pm Machine operator (Chris) is ready to load the first truck 20 minutes later ;)
19th June - Strip footings and brick piers being stockpiled and sifted out of the mud. A wet and soggy Friday in Sydney.


19/6 You may notice the bucket is a leaky one. Very good for sifting through the mud.
20th June - 95% complete. No work today, but the site is very clean and mostly ready for the last trailer load.
20/6 Leaky bucket and stockpiles ready for the final load


 22nd June - Site is levelled. All rubbish has been removed and the site is now clean and level.
22/6 Clearance is complete
In less than two weeks, the site is completely clear. That's quite a sobering thought, considered that the build may take 9 months from here.

We have advised the Builder and the clearance certificate was provided by DemoCorp on the 24/6/15. Now it's all up to our builder, Rawson Homes, to get the construction certificate sorted for the next step -  'The Slab'.  Rawson tell us we are still a few weeks from starting.  Once the construction certificate is provided, they still need to obtain a peg-out at the site (done by an external contractor).  We are apparently scheduled for a July start, but no specific date as yet.

Monday 29 June 2015

Certified Plans


We have now completed the plans for the private certifier. These plans are expected to receive the construction certficate.
It has been a long road to get to this point with some last minutes changes as a result of the hydraulic design and subsequent variations on the external design.
Today we signed the last plan (and variations) that will be the specified plan for construction.

Ground floor layout

First floor layout

Front elevation (north facing)

Side boundary elevation (east facing)

Rear elevation (South facing)

Side boundary elevation (West facing)
We are keen to meet our construction team and begin the construction. Let the build begin!

Thursday 18 June 2015

Drainage is a drain

Where do I start with this drainage story?  Well, when we first kicked off the pre-construction process and deliberated on the external sections we received the first revision of the site plans and building elevations. It was here that we got a glimpse of the solution;


I questioned the logic on the drainage solution and asked for the referenced hydraulic report. There was no hydraulic design. I requested that Rawson provide a hydraulic design, and this took several weeks. In fact, this was raised on 4/5/15. Only after pressing them repeatedly did we eventually get the report a month later and were quite shocked by the design. I picked up the phone and called the consultant to discuss the detail;


I discussed in detail the need for the absorption trench, its size and the likely additional costs.  He was adamant about the need for drainage of surface flows.  Fair enough.

Next on my discussion list was the location of the Rainwater tank. Its location shifted from the original plan, to the side of the house, right at the front, where it would be highly visible!
I also disliked the fact that it reduced access on the eastern boundary which we have been desperate to conserve for future excavation equipment access (in the case we may one day install a pool) and solar orientation.  I requested that we move the tank to the section DP1 and DP2.
Thankfully Rawson was awesome is resolving this downstream effect. Moving the tank to this area  would require the removal of the south facing study glazing. We couldn't locate this awning window elsewhere, so we asked for a feature window on the east study wall.  This, in turn, created a new challenge. This was where the Electrical Switchboard (SB) was located. As the SB was on the eastern wall of the study, this along with the Gas Meter would need to be relocated to the western wall of the Garage due to the new window.

Wow.
Rawson as i said, were awesome in getting this sorted. A small but important change that was both practical and aesthetic.
Revision A of the Hydraulic design was received, and a $0 Rawson variation for plan changes and we're moving forward;


For those interested, this is not a lightweight plan. Quite the contrary.
You can see from the rainwater tank detail, the site plan, and detail 1 (this charged line solution has tight relative levels to conform with)

Lots of PVC (thankfully we dont have to see it)

Note the level "OVERFLOW INVERT RL" of 41.26 


Thats alot of fill to remove

Now thats a trench!


Our next update will be the fixed price variation as they consolidate both sewer and stormwater provisional amounts in our contract.

This is going to hurt.


Wednesday 17 June 2015

Tiles


We had our meeting at Tiles Direct with Kylie a fortnight ago. It was a lengthy process, which neither of us had anticipated.
Whilst our consultant was helpful, we did have trouble selecting our main floor tile (for the ground floor living area) as they really had no suitable timber-look ceramics, due to the very limited range.  We had our heart set on timber-look tiling, so we reluctantly chose not to proceed with the ground floor tiling as a result. Not a good start.
On a positive we had plenty of choice with tiling for our bathrooms and powder rooms. There is a very reasonable range of floor and wall tiles in the Rawson standard. Whilst the standards are good, there are some anomalies in the areas of coverage. This leads to the first variation;
Extra tile supply to cater for ceiling height tiling behind vanity mirrors. But wait.. there's more to this.
Rawson provide a neat 32mm MDF board on the vanity wall, and mount the mirror on the board so that it appears to 'float'. The vanity wall begins at 750mm due to the cabinet height, and has a MDF board on 80% of that wall section. So what exactly are they tiling? I challenged the consultant on this, as she was adding the cost of tiles for the entire wall, when in fact the majority of it is covered by the mirror. This is clearly articulated in the plans that she had received. Still, the consultant needed clarification from Rawson before she conceded that indeed, less tiles are needed.
Other variations relate to;.
  • Brickbond tiling attracts extra labour costs. 
  • The subway tiles and mosaics selected in the main bathroom and powder rooms are not standard.
  • Feature (ie anything that's not off-white) grout.
  • Bermuda Square floor wastes

Tiles selected were largely based on our preference for practical yet timeless colour and a little flair around the mirrors.

Main Bathroom;
Floor - Lisse black 330x330
(Despite the name, this tile is not in fact black, but rather a dark charcoal)


Wall - Gloss white 300x450 (laid horizontal 'stacked')

Vanity Feature wall - Matt black subway 75x150 (laid horizontal 'brickbond') w/ Charred Ash Feature Grout (again, whilst the name is Matt black, it's more of a charcoal colour).


Floor waste - Bermuda Square tile covered


Bed 1 Ensuite;
Floor - Lisse black 330x330


Wall - Gloss white 300x450 (laid horizontal 'stacked')

Vanity Feature wall - Ivory 100x300 (laid horizontal 'brickbond') w/ Charred Ash Feature Grout


Floor waste - Bermuda Square tile covered


Powder Rooms;
Floor - Lisse black 330x330


Vanity Feature wall - White Gloss Hex mosaic 23x23 w/ Slate Grey Feature Grout


Floor waste - Bermuda Square tile covered


Tiling in the ground floor living area will be installed post handover.

Tuesday 9 June 2015

Electrical Fitout


After our Meeting with Barbara last week in Rhodes, we are finally at completion of the paperwork. Barbara was so helpful during this process. Her knowledge and quick communication was simply incredible, and we were really impressed.  Barbara has had many years experience in the electrical industry, has previously worked for Clipsal, and has an electrician for a husband!

The way the appointment ran was great.  It lasted for roughly 3 hours, and was presented in a way that was clear, concise and easy to follow.  Barbara's laptop was connected to a wall-mounted LCD screen so that our electrical plans were visible to us, and we could actually see changes that were made in real time.  We were also able to look at all of the choices available to us, in terms of switches, fittings etc.


We had very good inclusions within the tender and also the standards within the Rawson build to start with.
12x 11W LED downlights and the 'Lux' standard inclusions.
Lets start with the standard plan. What do you get?
Standard Inclusion Plan

Standard Inclusion Plan


Now the final plans. This is what we ended up with after the meeting and email conversations.
You may have to come back and have another look after reading ;)

Ground Floor Final Fitout

First Floor Final Fitout

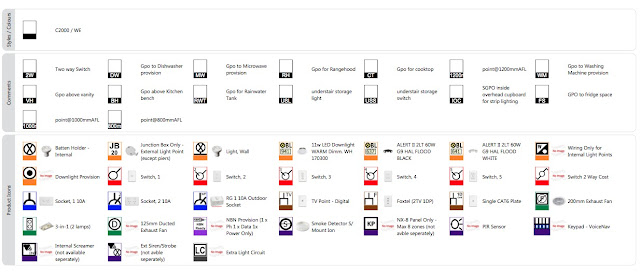
Icon / Code Key


Firstly, the additional points on this plan are;
5 x 10A 2 Socket GPOs
1x Digital TV Point
1x Foxtel Pre-wire
5x Category 6 Data points
3x Wiring only for light points
19x Downlight provisions (plug-base in the ceiling)
3x Flood lights (upgrades on external J-boxes)

As the house is a two storey, there is only one chance to fitout the ground level for lighting, power and data. At least 90% of the extra costs are incurred here.  Barbara advised us that she has seen many clients attempt to complete electrical work on the lower level post handover, and it has usually turned into a nightmare.
You will also see a strange mix of battens and downlight provisions, which is all due to the handover 'Occupation Certificate'. You must have at least one light in each room.
Data points are provided in the Leisure, Study, Dining (on ceiling), Family, and upstairs hallway (on celing). I will be using corporate grade wireless equipment that is available to me through work. The Access Points will be mounted on the ceiling to maximise decent WiFi throughout the house. The units are small minimalist white boxes, featuring internal aerials and small activity lights.


Lucky for us, we have an electrician in the family for post-handover fitout of the additional lighting.  This will be easier on the pocket upstairs and also means we will have access to 'trade supply pricing' for LED lighting throughout the home.
Upstairs is pretty standard. We have mainly placed lights in the bedrooms so that extra LED downlights can be simply retro-fitted post handover, and no hole patching will be necessary.

Extra lighting circuits in the ensuite were necessary as the nib wall doesn't run up to the ceiling. Another win here was that we had the cavity door moved in the WIR so that we had a wall section adjacent to the ensuite shower to provide more space for a towel rail, which was previously lacking. This will have a heated towel rail which will be installed after handover.
 ** This was a fortunate opportunity as we hadn't yet signed the internal selections. Otherwise a drafting charge would have followed. I can't help but think this is a common pitfall that project builders bank on.
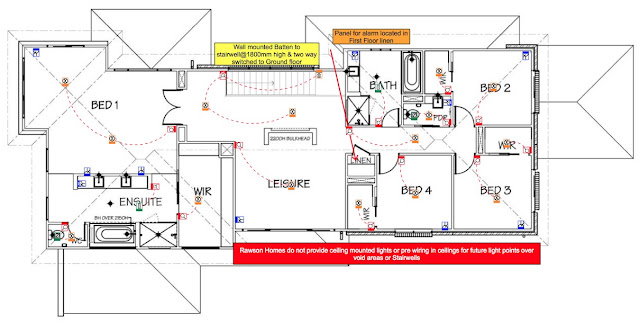
Also, with all these extra lights we had to pay for an additional 10A circuit on the switchboard!

Finally, there are some small luxuries hidden in the plan, which you may, or may not have noticed:
1) A power point installed in the kitchen cabinet (also switched on the kitchen wall switch) for under cupboard/over bench LED strip lighting.
The overhead cabinets will be mounted on 20 mm which will create a neat / hidden reveal to hide the LED strip.
 ** Another fortunate change due to unsigned interior selection paperwork
2) Multiple areas using two-way switching: in entry hallway, stairs, spot lighting in Laundry/Garage, upstairs hallway.  The convenience of two-way switching can't be beaten. The only standard here for Rawson is for the stairs. All others are variations to standard.
3) Master Bedroom bedside pendant light provisions.  ie extra wiring in the ceiling and light switches on the nib wall behind the bed. His and Hers switched lights.